
Enter Missing PayPal Fees in QuickBooks
UPDATE: Since this article was published, PayPal has resolved the main issue of separating fees from payment transactions. The feed now imports fees and payments as separate line items that can be mapped to individual ledger accounts. That said, the instructions for manually importing PayPal transaction history may still be useful.
This is a step by step procedure to enter PayPal fees that are missing from the Bank Feed so you can reconcile your PayPal Activity History. If you use PayPal on your website and QuickBooks for accounting, this procedure may save you hours of frustration.
Why aren’t PayPal fees showing up in the Bank Feed?
This is a common question that neither PayPal nor QuickBooks have been able to satisfactorily answer. One theory is that the feed was designed for businesses that only use PayPal for expenses.
The PayPal Sync App, on the other hand, may update fees, but apparently does not let you review and categorize expenses. Neither option is ideal for websites that have large number of transactions on PayPal. More about the PayPal Sync App
If you run a website that receives a large number of orders, it may not be practical to maintain QuickBooks sales entries one at a time as they come in. Unfortunately, the PayPal Feed generates thousands of transactions that do not balance when you reconcile. More about Issues with PayPal and QuickBooks
How Do I Enter PayPal Fees in QuickBooks?
First, read this disclaimer.
Using this procedure, you can not only successfully sync the PayPal Bank register, but also sync PayPal with other Bank registers in QuickBooks.
Important notes are highlighted.
- Reconcile Bank Account Registers other than PayPal first
- Update PayPal Activity History
- Download “Comma Delimited – Balance Affecting Payments” version of the Activity History
- Clean Up Data Files
- Exclude (ignore) pending Bank Feed entries
- Import PayPal Activity History to QuickBooks the first time for payments (income and expenses)
- Import the PayPal Activity History to QuickBooks a second time to record PayPal fees
- Reconcile PayPal Register
Issues with PayPal and QuickBooks
PayPal Bank Feed
- Feed does not include PayPal fees
- PayPal does not reflect a “cleared” balance, so QuickBooks balances do not correspond to PayPal balances by date
- Feed does not include Backup Fund Transfers, so some transactions between other Bank feeds are not recorded
- QuickBooks Cleared Balance does not match PayPal End Balance on Reconcile because of missing transactions
PayPal Activity History
- QuickBooks only accepts 1000 rows at a time
- CSV Amounts contain commas, breaking import
- Payment and Fee in separate columns of single row, not individual rows
PayPal Sync App
- No review before transactions are imported
- Sync does not automatically categorize Transactions
- You cannot use both Sync and Feed at the same time
How Do I Download Activity History from PayPal?

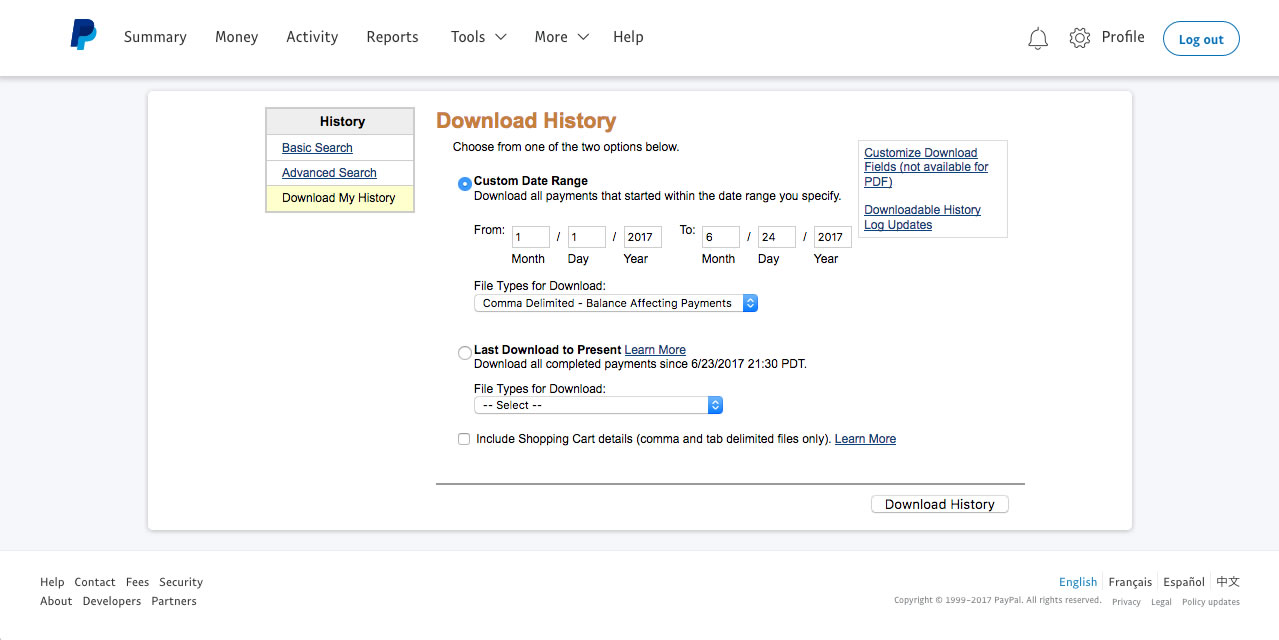
- Log into PayPal.com
- Click “Reports”
- Click “Activity Downloads” (Screenshot)
- Switch to Classic Mode (Screenshot)
- Enter Date Range
- Select “Comma Delimited – Balance Affecting Payments” to preserve “hold” and backup fund transfer transactions.
Do not use “All Activity” (because it includes “authorizations” ) or “Completed Payments” (because it does not include “holds” or backup fund transfers). - Click “Download History”
Why Does QuickBooks Show an Error When I Import the PayPal Activity History CSV File?
There are two main reasons:
- QuickBooks only accepts 1000 rows at a time
- PayPal CSV Amounts contain commas, breaking import
How Do I Cleanup the PayPal Activity History CSV?
- Open the Activity History CSV file in a plain text editor like Notepad or BBEdit (do not use Word or other “word processing” apps).
- Find any amounts greater than $1000 and remove commas (use find and replace)
- Split into multiple files if there are more than 1000 rows (Copy header row to the first line of each file)
How Do I Import PayPal Activity History into QuickBooks?
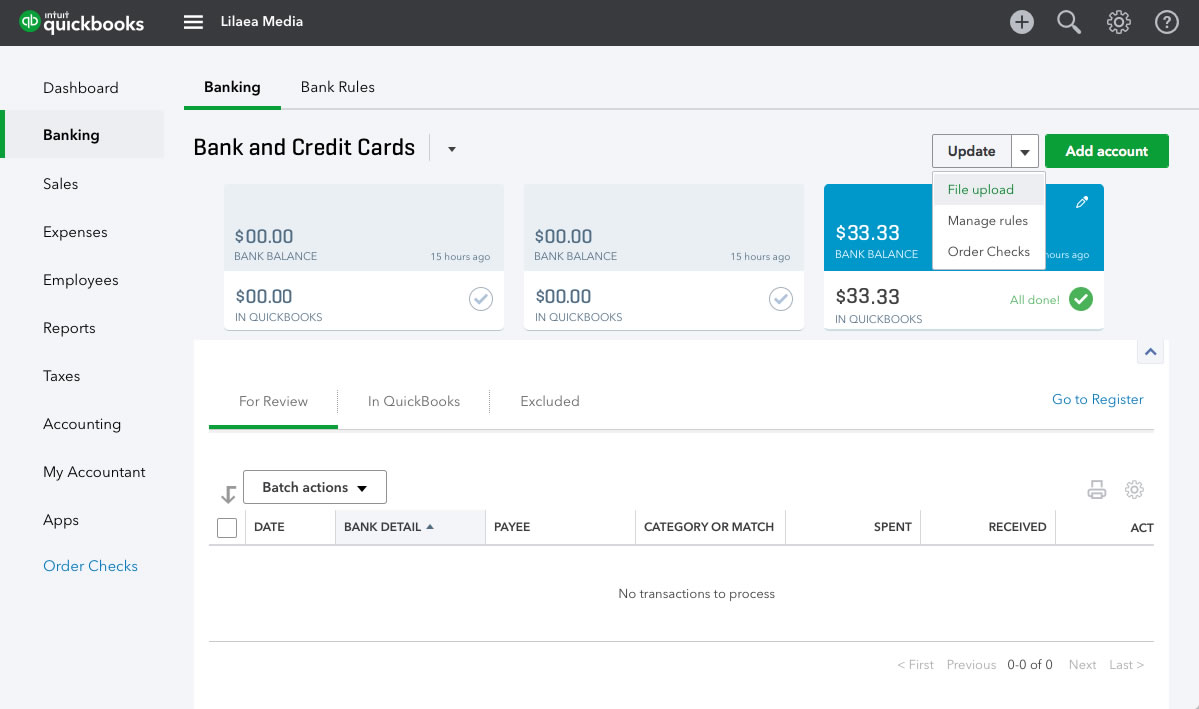
- Go to “Banking” in QuickBooks
- Select the PayPal account
- Before you do anything with the PayPal register, select all the pending “For Review” transactions, open the “Batch Action” menu and select “Exclude Selected.” The existing Bank Feed transactions will be duplicated when you upload the Activity History.
- Click the arrow next to the “Update” button (do not click “Update”!) to open the banking menu. Select “File Upload.” (Screenshot)
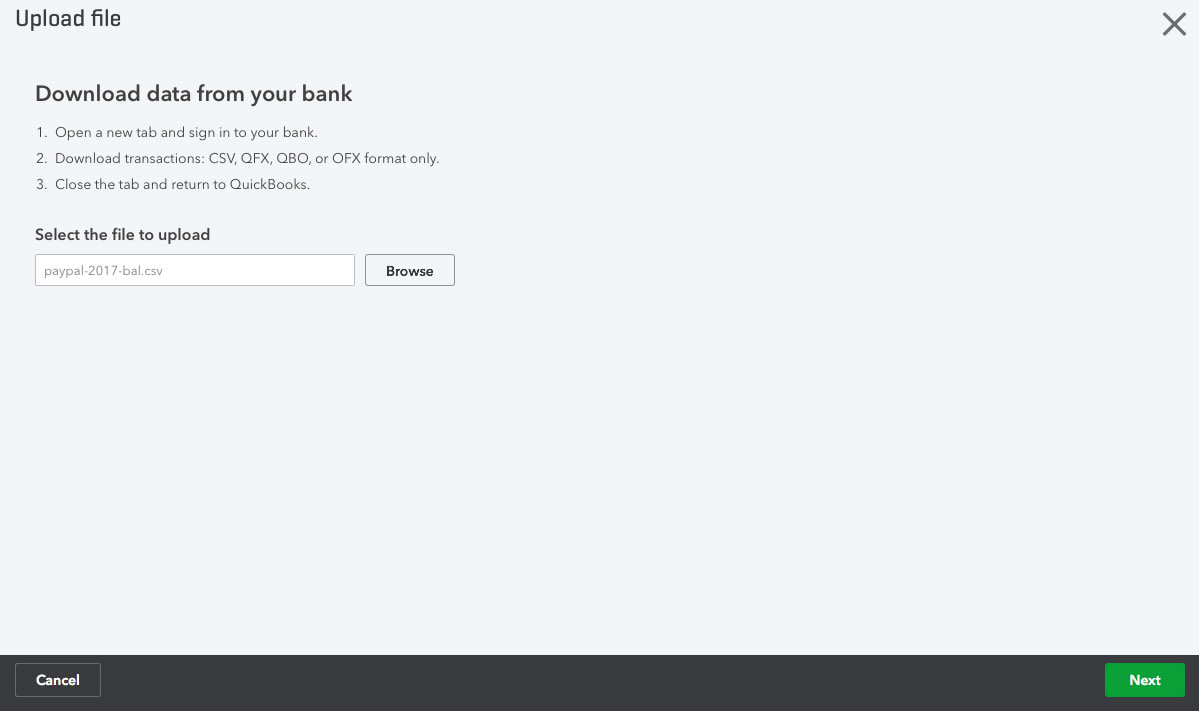
- Locate the CSV file that you downloaded from PayPal on your computer and click “Next.” (Screenshot)
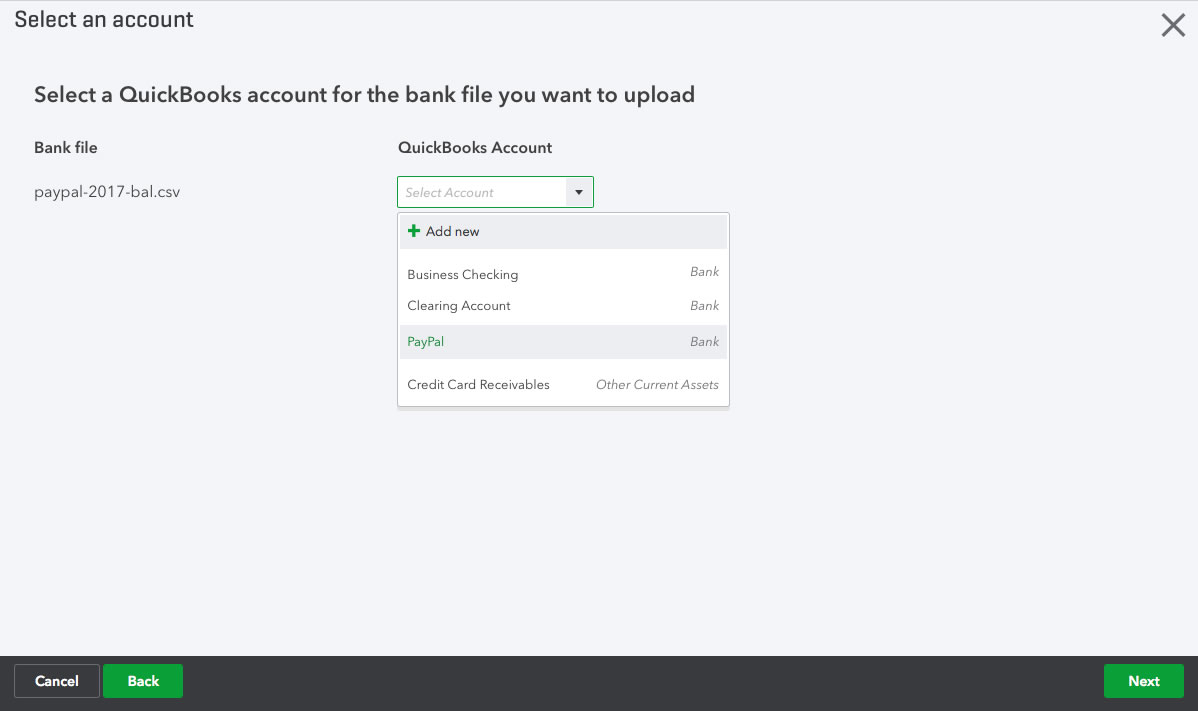
- Select PayPal from the Bank menu and click “Next.” (Screenshot)
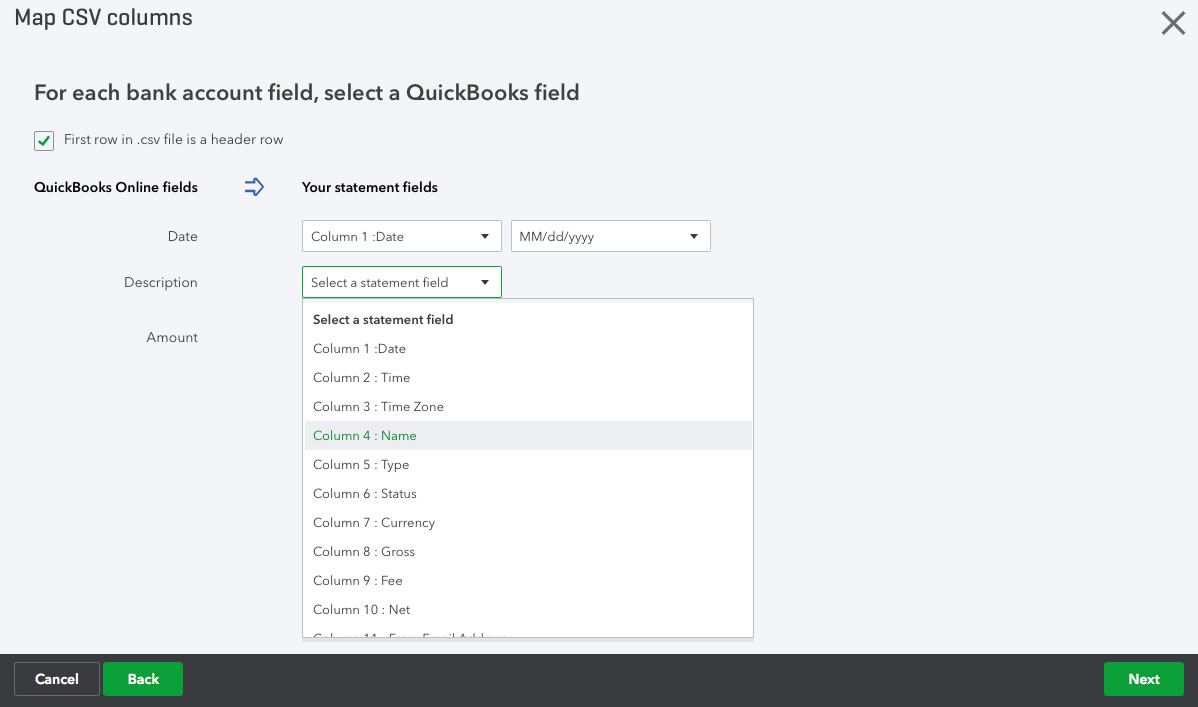
- Verify that the checkbox labeled “First row in .csv file is a header row” is checked
- Select “Date” from the “Date” menu and enter “MM/dd/yyyy” for “Format.” This will be the default.
- Select the “Name” column for “Description.” (Screenshot)
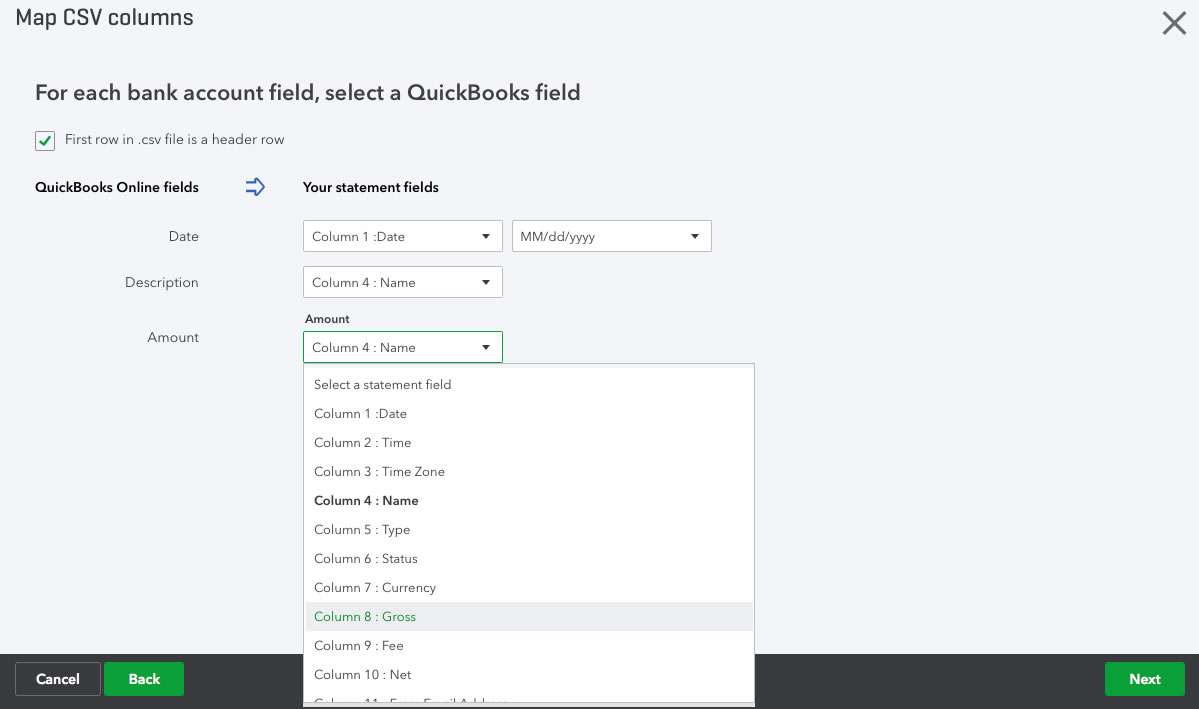
- Select the “Gross” column for “Amount.” (Screenshot)
- Click “Next.”
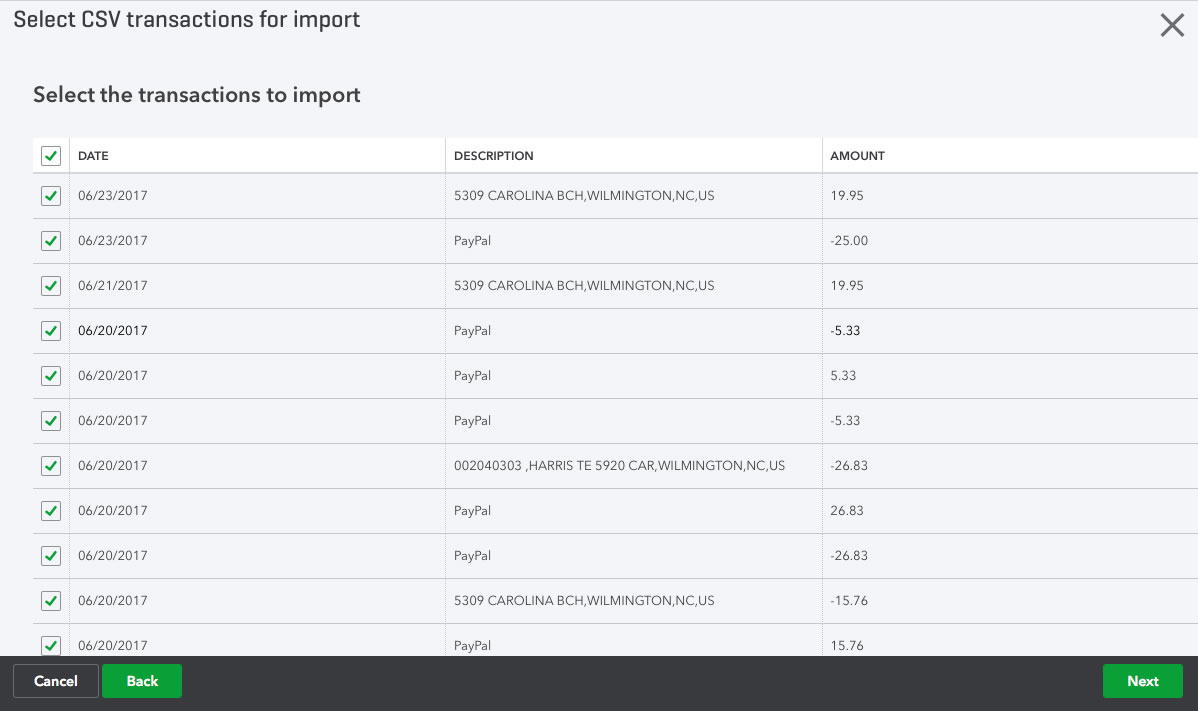
- Select the transactions to import (all are selected by default). Click “Next.” (Screenshot)
- QuickBooks will load the transactions into the “For Review” panel under the “Banking” page for your bank.
How Do I Record Bank Feed Transactions In QuickBooks?
“Recording” means one of three actions:
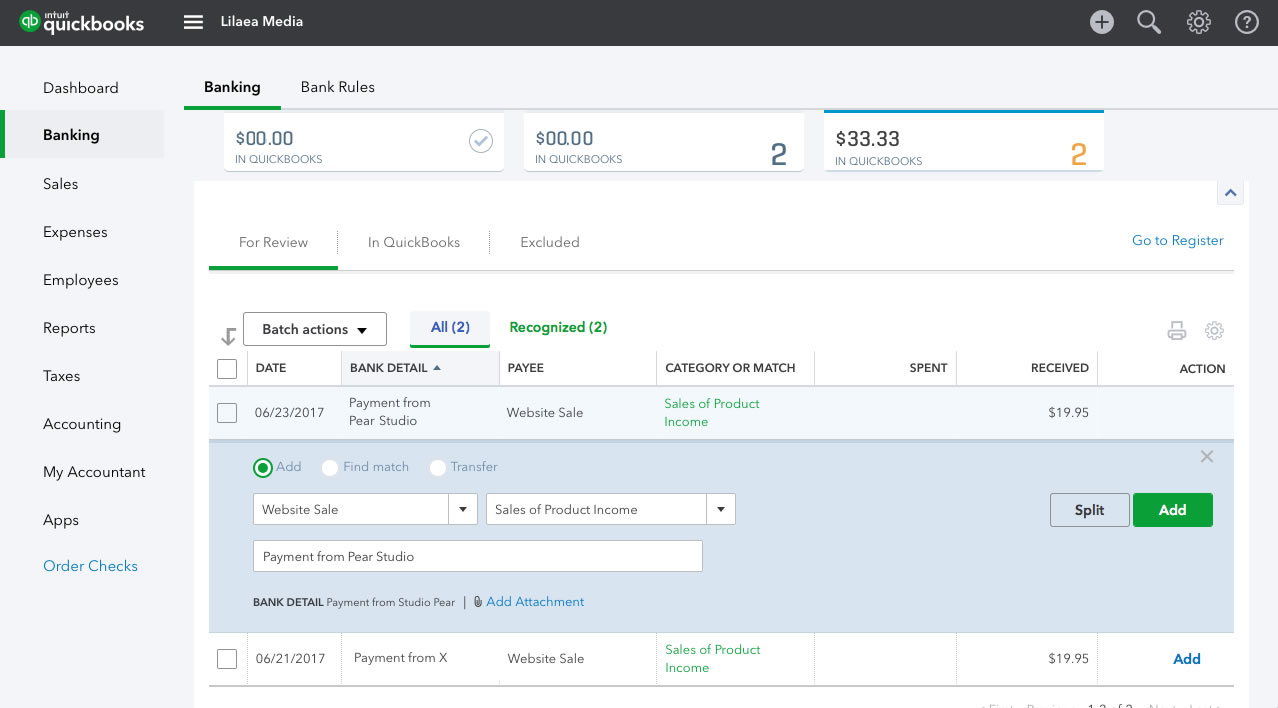
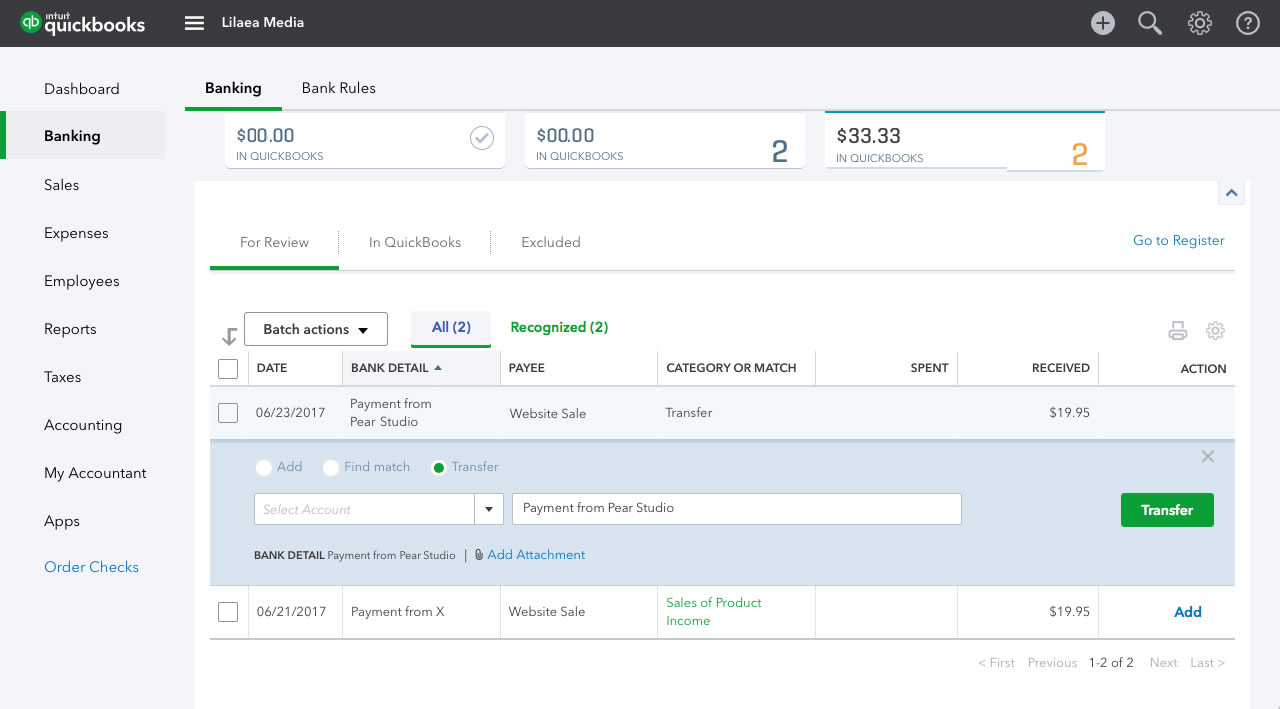
- Add: creates a transaction in the Bank register and a corresponding entry in a corresponding QuickBooks account. When you do this, you must select a “Payee” (recipient or sender) and an “Account” (ask an accountant the correct QuickBooks account to use) (Screenshot)
- Find Match: links a pending “For Review” transaction to an existing transaction in QuickBooks. In some cases it QuickBooks may update multiple accounts to complete the link (e.g., Payment Recieved).
- Transfer: Simultaneously adds debit and a credit transaction in two Bank registers but does not use a corresponding QuickBooks account. Use this option for any transactions where you transfered funds from one bank to another. (Screenshot)
Enter PayPal “Hold” Transactions
Record all internal PayPal “hold” transactions before you record any other transactions.
- Sort by “Bank Detail”
- Select all transactions labeled just “PayPal” and batch record them to “Clearing Account.” This will get them out of the way so you can focus on the other transactions.
Enter Bank Transfers
If you are using QuickBooks to manage multiple bank accounts, including PayPal, you may want to record funds moved between them as “transfers” in QuickBooks, not as regular Income/Expense entries.
If you are only using PayPal in QuickBooks, you can ignore this step and simply “Add” the transactions like any other Income/Expense entry.
Otherwise, follow these steps:
- Scan the rows for any “Bank Detail” that mentions another bank.
In PayPal, the description usually begins with “Bank Account.” For other banks, you may need to look carefully at the description to determine if the transaction is a transfer.
- If the transfer is to/from another bank you are managing in QuickBooks AND you have not yet reconciled the other bank’s register:
Click on the row and select “Transfer.”
The dialog will change showing a menu of Banks on the left. Select the PayPal (or the other bank) from this menu and click “Transfer.” This will add an entry into that bank’s register and record the bank as the “Account” in QuickBooks. You will use this entry to “Match” when you record transactions for the other bank later.
- If the transfer is to/from another bank you are managing in QuickBooks AND you have already reconciled the other bank’s register:
Click on the row and select “Find Match” to link it to the existing transaction entry you entered earlier.
- If the transfer is not to/from a bank you are managing in QuickBooks, just “Add” the transaction.
Enter Expense Transactions
- Categorize deductible expense transactions to their appropriate Expense Account Registers (check with an accountant). If you know you have already entered a corresponding Expense, use “Find Match” to link it. Otherwise, use “Add.”
- Categorize non-deductible expense transactions to an Equity Account Register (I use “Member Draws”). This keeps them out of the Profit/Loss report at tax time. Again, if you know you have already entered a corresponding Expense, use “Find Match” to link it. Otherwise, use “Add.”
- Some transactions may be hard to identify, especially debit card and ATM transactions. Many times these only include the address of the merchant or ATM in the memo line. I use google maps to identify the payee by the address.
Enter Income Transactions
- Record income transactions to the appropriate Income Account Register. If you know you have already entered a corresponding Payment Received or Sales Receipt, use “Find Match” to link it.
- Otherwise, use “Add.”
How do I Enter Multiple Bank Transactions at Once?
- Sort by “Bank Detail”
- Select similar rows by checking the box on the left
- Scroll up to the “Batch Actions” menu and select “Modify Selected”
- When the dialog opens, select the appropriate Payee and Account and click “Apply”
- After the page refreshes, open the “Batch Actions” menu again and select “Accept Selected.”
How Do I Add PayPal Fees in QuickBooks?
To make things even more confusing, PayPal reports fees on the same row of the Activity History as the corresponding payment. This fee does not show in the Bank Feed, causing a change in the balance that does not correspond to the register.
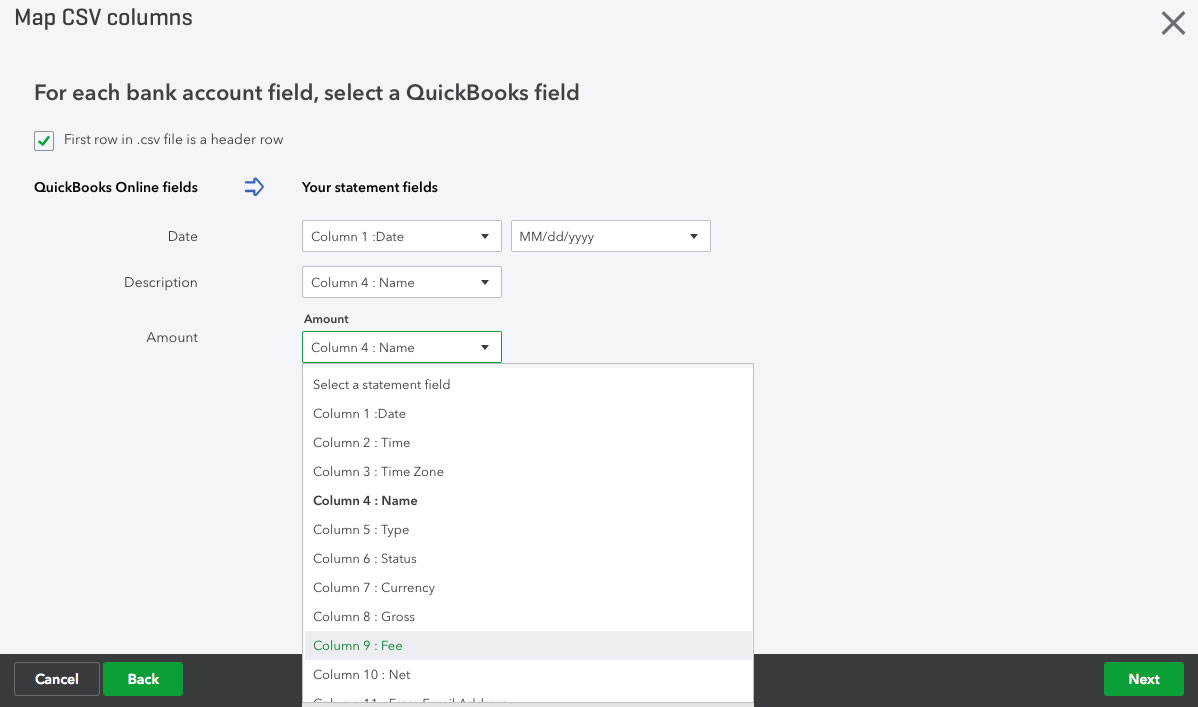
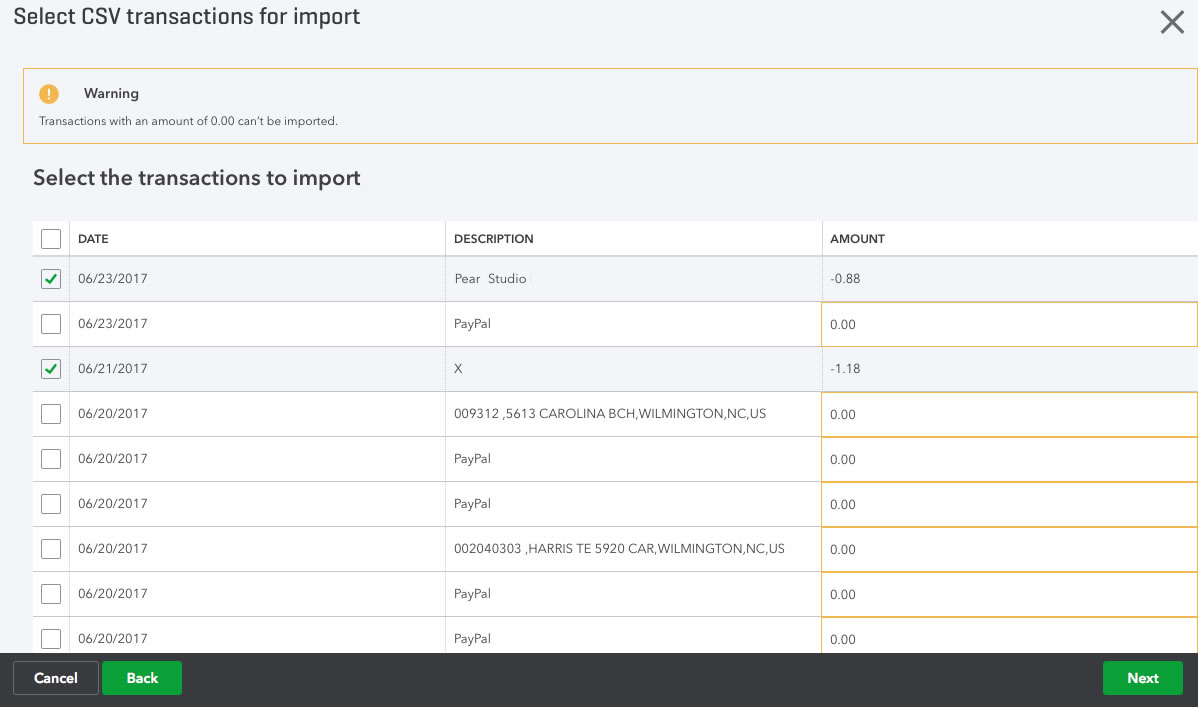
- After you are finished recording all the pending “For Review” transactions, follow the steps to import the Activity History CSV file a second time, only this time select “Fee” instead of “Gross” as the column to use for the “Amount.” (Screenshot)
- QuickBooks will ignore any zero values and only add entries for Activity History rows that contain fees. (Screenshot)
- Once PayPal fees are imported as pending “For Review” transactions, you can Batch record them all at the same time to the appropriate QuickBooks Account and your balance will add up correctly.
How Do I Reconcile a Bank Register in QuickBooks?
- After all of the pending “For Review” transactions for a Bank are recorded correctly, click “Go To Register” at the top right of the Banking page.
- Once the page loads, Click “Reconcile” at the top the page.
- Enter the “Statement Ending Date” and “Ending Balance” and click “Ok.”
- If the cleared balance is equal to the Ending Balance, click “Finish Now” and you are done.
- Otherwise, check the cleared items for errors.
- If you cannot make the balances agree, click “Cancel” and review the register for errors.
- If worse comes to worst, you can open “In QuickBooks,” undo all of the transactions withing the time period. You can either try to find the error or just exclude all and start over.
Why Use “Balance Affecting Payments” to import PayPal Transactions?
To understand why the PayPal Bank Feed was not adding up, I had to experiment with reconciling the PayPal register and talk with PayPal’s support. They explained that the balances were changing as a result of “holds” that are placed on the account during the transaction process. Unlike other bank feeds, PayPal does not reflect the “cleared” balance, but instead shows the current pending balance.
If you look at the raw activity (full version) you see the following things occur when a payment is made from your PayPal account.
- Transaction Authorized: The merchant issues an authorization request. This shows up as a debit in the history, but does not change the balance. Do not use the “All Transactions” history when you reconcile the PayPal register, because it would result in a duplicate debit to the account in QuickBooks.
- Hold Placed: PayPal places a matching “hold” on the account in the same amount. This appears as an debit in the history and flags the transaction as “Pending,” but does not appear in the PayPal Bank Feed.
- Backup Funds Transfered: If your PayPal balance drops below zero, PayPal transfers funds from your linked Bank Account. This appears as a credit in the history, but appears as a zero balance in the Activity History. Backup fund transfers do not appear in the PayPal Bank Feed.
- Funds Captured: Funds are sent from your account to the merchant account. This appears as another debit in the history and appears in the PayPal Bank Feed.
- Hold Released: PayPal reverses the “hold.” This appears as a credit in the history and flags the transaction as “Complete,” adn does not appear in the Bank Feed.
Other transactions can be taking place during this process, so at any given time, the PayPal balance does not necessarily correspond to the ledger as it would for a typical bank account. It can take days before PayPal releases a “hold” and a payment is flagged as “Complete.”
By including these hold transactions in your QuickBooks bank register it is much easier to follow the balance and identify any mistakes you may have made entering Expenses, Payments, Sales Receipts or other transactions.
When reconciling PayPal, you must use a statement close date and balance that occurs before any “holds” have been placed and after any “holds” have been released or the cleared balance will not agree with ending balance. If the register does not reconcile, you may need to open the CSV in Excel or a text editor to find a position different from the ending balance in the feed.
Delete Excluded Entries
If you clean up invalid “Excluded” transactions, you can delete them forever by opening the “Batch Actions” menu and selecting “Delete.”
Why not use the PayPal Sync App to record PayPal Fees?
When you request to install the App, QuickBooks online makes you fill out a survey and, in our case, responds with the following:
Since you have expenses in PayPal, we recommend using our PayPal Bank Feed integration. You’ll get the benefit of autocategorization of your expenses and the opportunity to review all your transactions before they hit your books.
If you instead wish to use Sync with PayPal, your expenses will be not be categorized and you will not have an opportunity to review the transactions before they are imported into your books.
Our new integration will combine the best of both integrations and if you have provided your contact details, we’ll reach out when it’s ready!
Based on this message, QuickBooks may be working to resolve the issues outlined in this article. We can only hope.
— JF
Resources
Disclaimer
The steps described here should not be considered accounting advice. Consult with your accounting professional how to record transactions correctly for your business.
FAQs About Child Theme Configurator
We’ve compiled the most frequently asked questions (FAQs) for easy reference. If you have a question that is not covered here please use our contact form and provide as much detail as possible.
How do I make my Theme responsive?
The short answer is to use a responsive Parent Theme. Some common methods for responsive design are:
- Avoiding fixed width and height values. Using max- and min-height values and percentages are ways to make your designs respond to the viewer’s browser size.
- Combining floats and clears with inline and relative positions allow the elements to adjust gracefully to their container’s width.
- Showing and hiding content with Javascript.
Tutorial Videos
 We’ve put together a video tutorial that shows how to use Child Theme Configurator to make a fixed-width theme responsive. View Video
Will this slow down my site?
Web site performance depends on a number of factors unrelated to the use of a single plugin. That said, Child theme Configurator is designed to add the minimum amount of additional overhead possible and can actually improve performance. For example:
- Child Theme Configurator is a “code generator.” This means it creates or updates files that are already being read by the system. On the front-end, there are no database calls so WordPress can run independent of the plugin. In fact, you can remove Child Theme Configurator when you are finished setting up your theme.
- Customizations are applied to a stylesheet file that is cached by the browser and can be minimized and/or cached by a performance caching plugin. Because this stylesheet contains mostly “overrides” to existing styles, it is typically small in comparison to other stylesheets.
- The code that drives the admin interface only loads when the tool is being used from the WordPress Admin, including Javascript and CSS. This means that it will not get in the way of other admin pages.
- The biggest performance hit occurs when you generate the Child Theme files from the Parent/Child tab, but this is a one-time event and only occurs from the WordPress Admin.
If I uninstall Child Theme Configurator are child themes affected?
No. Child Theme Configurator is designed to work independently of themes and plugins. Just remember that if you re-install, you must rebuild the configuration data using the Parent/Child tab.
FAQs
Does it work with Multisite?
Yes. You can either go to “Network Admin > Themes > Child Themes” or “Tools > Child Themes” if working in a specific Site. Child themes must be “Network enabled” to preview and activate for Network sites. NOTE: Only users with “install_themes” capability will have access to the Child Theme Configurator. See Working with Multi-site WordPress.
FAQs
HELP! I changed a file and now I am unable to access my website or login to wp-admin to fix it!
To back out of a broken theme you have to manually rename the offending theme directory name (via FTP, SSH or your web host control panel file manager) so that WordPress cannot find it. WordPress will then throw an error and revert back to the default theme (for WP 4.1 this is “Twenty Fifteen”).
The child theme is in your themes folder, usually
[path/to/wordpress]/wp-content/themes/[child-theme]
To prevent this in the future, always test your child themes with Live Preview before activating them.FAQs
Why are my menus displaying incorrectly when I activate the new child theme?
…or…
Why is my custom header missing when I activate the new child theme?
…or…
Why does my custom background go back to the default when I activate the new child theme?
…or…
Why do my theme options disappear when I activate the new child theme?
These options are specific to each theme and are saved separately in the database. When you create a new child theme, its options are blank.
Many of these options can be copied over to the child theme by checking “Copy Parent Theme Menus, Widgets and other Options” when you generate the child theme files on the Parent/Child tab.
If you want to set different options you can either apply them after you activate the child theme, or by using the “Live Preview” under Appearance > Themes.
- Menus: Go to Appearance > Menus and click the “Locations” tab. By default, the primary menu will generate the links automatically from the existing pages. Select your customized Menu from the dropdown and click “Use New Menu.” This will replace the default menu and you will see the correct links.
- Header: Go to Appearance > Header. Some themes will show the “Title” and “Tagline” from your “General Settings” by default. Click “Choose Image” and find the header from the Media Library or upload a new image. This will replace default with your custom image.
- Background: Go to Appearance > Background and choose a new background color or image.
- Options: Every theme handles options in its own way. Most often, they will create a set of options and store them in the WordPress database. Some options are specific to the active theme (or child theme), and some are specific to the parent theme only (meaning the child theme CANNOT override them). You will have to find out from the theme author which are which.
How do I move changes I have already made to a Child Theme?
Things get a lot more complicated when you have already made significant changes to your Parent theme. You will need to move all your modifications into a child theme so that updating the parent does not wipe them out. Follow these steps. FAQs
How do I add Web Fonts?
The easiest method is to paste the @import code provided by Google, Font Squirrel or any other Web Font site into the @import tab. The fonts will then be available to use as a value of the font-family rule. Be sure you understand the license for any embedded fonts.
You can also create a secondary stylesheet that contains @font-face rules and import it using the @import tab. FAQs
Does it work with plugins?
Child Theme Configurator Pro extends Child Theme Configurator to let you easily modify styles for any WordPress Plugin installed on your website. Child Theme Configurator Pro scans your plugins and allows you to create custom stylesheets in your Child Theme. Learn more FAQs
Why doesn’t this work with my (insert theme vendor here) theme?
Some themes (particularly commercial themes) do not correctly load parent template files or automatically load child theme stylesheets or php files.
This is unfortunate, because in the best case they effectively prohibit the webmaster from adding any customizations (other than those made through the admin theme options) that will survive past an upgrade. In the worst case they will break your website when you activate the child theme.
Contact the vendor directly to ask for this core functionality. It is our opinion that ALL themes (especially commercial ones) must pass the Theme Unit Tests outlined by WordPress.org. FAQs
Where is it in the Admin?
For most users the Child Theme Configurator can be found under “Tools > Child Themes.”
WordPress Multisite (Network) users can also go to “Network Admin > Themes > Child Themes.” See Working with Multi-site WordPress.
NOTE: Only users with “install_themes” capability will have access to the Child Theme Configurator.
FAQs
Why doesn’t the Parent Theme have any styles when I “View Parent CSS”?
Your Parent theme is probably using a separate location for the stylesheets. Select individual stylesheets from the “Parse Additional Stylesheets” section of the Parent/Child tab and click “Generate Child Theme Files” again. FAQs
Where are the styles? The configurator doesn’t show anything!
All of the styles are loaded dynamically. You must start typing in the text boxes to select styles to edit.
“Base” is the query group that contains styles that are not associated with any particular “At-rule.”
Start by clicking the “Query/Selector” tab and typing “base” in the first box. You can then start typing in the second box to retrieve the style selectors to edit. FAQs
Why do the preview tabs return “Stylesheet could not be displayed”?
You have to load a child theme from the Parent/Child tab for the preview to display. This can also happen when your WP_CONTENT_URL is different than $bloginfo(‘site_url’). Ajax cannot make cross-domain requests by default. Check that your Settings > General > “WordPress Address (URL)” value is correct. (Often caused by missing “www” in the domain.) FAQs
Can I edit the Child Theme stylesheet manually offline or by using the Editor or do I have to use the Configurator?
You can make any manual changes you wish to the stylesheet. Just make sure you import the revised stylesheet using the Parent/Child panel or the Configurator will overwrite your changes the next time you use it. Just follow the steps as usual but select the “Use Existing Child Theme” radio button as the “Child Theme” option. The Configurator will automatically update its internal data from the new stylesheet. FAQs
If the parent theme changes (e.g., upgrade), do I have to update the child theme?
No. This is the point of using child themes. Changes to the parent theme are automatically inherited by the child theme.
A child theme is not a “copy” of the parent theme. It is a special feature of WordPress that let’s you override specific styles and functions leaving the rest of the theme intact. The only time you need to make changes after an upgrade is if the parent removes or changes style or function names. Quality themes should identify any deprecated functions or styles in the upgrade notes so that child theme users can make adjustments accordingly. FAQs
Where are the .php files?
The configurator automatically adds a blank functions file (functions.php) to the child theme directory. You can copy parent theme template files using the Files tab. If you want to create new templates and directories you will have to create/upload them manually via FTP or SSH. Remember that a child theme will automatically inherit the parent theme’s templates unless they also exist in the child theme directory. Only copy templates that you intend to customize.FAQs
How do I change a specific color/font style/background?
You can override a specific value globally using the Rule/Value tab. See Rule/Value, above.
How do I add styles that aren’t in the Parent Theme?
You can add queries and selectors using the “Raw CSS” textarea on the Query/Selector tab. See Query/Selector, above. FAQs
How do I remove a style from the Parent Theme?
You shouldn’t really “remove” a style from the Parent. You can, however, set the rule to “inherit,” “none,” or zero (depending on the rule). This will negate the Parent value. Some experimentation may be necessary. FAQs
How do I remove a style from the Child Theme?
Delete the value from the input for the rule you wish to remove. The Child Theme Configurator only adds overrides for rules that contain values. FAQs
How do I set the !important flag?
We always recommend relying on good cascading design over global overrides. To that end, you have ability to change the load order of child theme styles by entering a value in the “Order” field. And yes, you can now set rules as important by checking the “!” box next to each input. Please use judiciously. FAQs
How do I create cross-browser gradients?
The Child Theme Configurator uses a standardized syntax for gradients and only supports two-color gradients without intermediate stops. The inputs consist of origin (e.g., top, left, 135deg, etc.), start color and end color. The browser-specific syntax is generated automatically when you save these values. See Caveats, below, for more information. FAQs
How do I recommend a question for these FAQs?
If you have a question that is not covered here please use our contact form and provide as much detail as possible.
How Child Themes Work with WordPress
No one theme can do everything you want.
Nor should it. Trying to be “one size fits all” actually makes a theme less useful. The more features that are built into a theme, the more complicated the interface gets, the slower the site runs, and the buggier the code becomes.
A child theme allows you to start with a well designed, stable theme that is not bloated with bells and whistles and then add the missing nuances yourself. A child theme lets you create the site you want by extending an existing WordPress theme with your own personal touch.
Most importantly, a child theme does not restrict you to the few custom options the theme provides. It becomes a blank canvas on which you can paint anything you want, and Child Theme Configurator makes it easier.
This tutorial explains five important concepts of WordPress child themes:
- The Terms “stylesheet” and “template” have specific meanings for WordPress themes.
- WordPress runs the active theme first. If the active theme is using another theme as a parent, WordPress then runs the parent theme (and the active theme officially becomes a “child” theme).
- Themes and plugins should use the “wp_enqueue_scripts” action so WordPress can control the order in which stylesheets and scripts are loaded.
- The Active theme’s “style.css” file should be loaded last, whether or not it is used by the theme.
- Some themes and plugins do not follow Concepts 3 and 4, but there are workarounds.
Concept 1: The Terms “stylesheet” and “template” Have Specific Meanings for WordPress Themes.
We normally use the term “stylesheet” to mean “a CSS file that defines how elements should be drawn by the browser.”
However, in the context of WordPress themes, “stylesheet” refers to the active theme’s directory name inside the theme root.
For example, if “Twenty Fifteen” is the active theme, the function get_stylesheet() would return “twentyfifteen”. get_stylesheet() always returns the active theme’s directory name inside the theme root whether or not the active theme is a child theme.
We usually use the term “template” to mean “a PHP file used to render output sent to the browser.” Often a single response is the combined result of several templates.
Unfortunately, in the context of WordPress themes, “template” refers to the theme used as a parent, or fallback theme. It is a specific “header” property used in a theme’s style.css file. It is also what makes WordPress consider a theme to be a “child” theme.
The function get_template() returns the parent theme’s directory name inside the theme root if the active theme is a child theme, but returns the active theme’s directory name otherwise.
Read more about confusing WordPress theme functions and “header” properties.
Why This Is Important:
- “Template” refers to the “parent” theme when describing a theme directory.
- “Stylesheet” refers to the “child” or “active” theme when describing a theme directory.
- For the purpose of this tutorial, only the terms “parent,” “child” or “active” are used to describe themes. The term “template” always refers to a PHP file used to render output to the browser, and “stylesheet” always refers to specific a CSS file.
Concept 2: WordPress runs the active theme first, then runs the parent theme.

WordPress Basic Program Flow (click to enlarge)
style.css) to get the theme’s “header” properties. It then checks if the theme has a functions file (functions.php) and executes it if it exists.
If the theme’s “header” properties indicate another theme should be used as a parent it then looks for a functions file in the parent theme and executes it as well.
This is the most important behavior of a WordPress child theme: two sets of functions are executed, first the Child, then the Parent.
Next, WordPress determines the “template” to use based on the nature of the web site request. Once it decides the type of output to render, it first checks the active theme directory for the most appropriate “template” file.
If it does not find it there, and the active theme is a child theme, it then checks the parent theme directory for an appropriate “template” file. Read more about how WordPress determines the most appropriate “template” file for the job.
WordPress begins to render the template file, executing instructions as it goes. Each time an additional template is required, WordPress checks the theme directories, first the child, then the parent, for the most appropriate match and runs it.
Throughout this process, WordPress fires various “actions” that branch off to other sections of code. The next section explains how actions are used with themes to control stylesheets and scripts.
Why This Is Important:
- WordPress will use the child version of a template if it exists. This means you can customize the child version without changing the parent version.
- WordPress will use the parent theme template if it does not exist in the child theme. This means you only need to create child theme templates you want to customize.
- The child theme runs first so you can “override” specific functions in the child theme functions file (assuming the parent functions are coded correctly, see Concept 5).
Concept 3: Themes and plugins should use the “wp_enqueue_scripts” action to load stylesheets.

A Simple Diagram of wp_enqueue_scripts action (click to enlarge)
Themes and Plugins can add functions to an action queue and they will be run in order of priority when when WordPress executes that particular action. By default, they will run in the order they were added to the queue.
The priority can be set to a specific value to place it higher or lower in the queue. This allows Themes and plugins to influence when a function runs in relation to other functions in the program flow.
The most important action when it comes to loading stylesheets and scripts is the “wp_enqueue_scripts” action. As WordPress runs, themes, plugins and other components add functions to this action so that they are all output to the browser in a controlled sequence at one time.
Using the wp_enqueue_scripts action allows a child theme to override the default styles of the theme, thereby customizing the appearance. This is explained in more detail in the next section.
Some themes still hard-code stylesheet links into the template file. As a result WordPress cannot control the order stylesheets load which leads to other issues. This is discussed in more detail in Concept 5.
Why This Is Important:
- Using
wp_enqueue_scriptsto load stylesheets and scripts is recommended because it allows WordPress to optimize the load order and prevent conflicts. - This method also allows themes and plugins to influence how stylesheets and scripts load in relation to one another.
- Hard-coding stylesheet links in the header template causes stylesheets to load in the wrong order (see Concept 5)
Concept 4: The Active theme’s “style.css” file should be loaded last, whether or not it is used by the theme.
Some themes do not use the conventional style.css file for their styles. Although this is perfectly acceptable, the theme should enqueue the active theme’s style.css anyway to enable the styles to be customized by a child theme.
Even if a theme does not load the active style.css file, Child Theme Configurator provides ways to make it work.
What does CSS Mean?
CSS is short for “Cascading Style Sheets”, a language that defines how elements are drawn on in the browser. As CSS is read from top-to-bottom, rules “cascade” down to the rules below them, in other words, rules that are defined later “inherit” the rules defined earlier.
This also applies to multiple stylesheets as well. For example, lets assume a web page uses two stylesheets. In the HTML, suppose they are loaded like this:
<link rel="stylesheet" src="/path/to/stylesheet1.css?x71836" />

<link rel="stylesheet" src="/path/to/stylesheet2.css?x71836" />
This means that the rules in stylesheet2.css inherit the rules in stylesheet1.css. In addition, rules in stylesheet2.css take priority, or “override,” rules in stylesheet1.css.
Therefore, the rules in stylesheet2.css are the “final word” for how elements are drawn, but any rules in stylesheet1.css will be used if they are not defined in stylesheet2.css.
CSS in WordPress

Simple Diagram for Loading Parent and Child Stylesheets (click to enlarge)
Therefore, WordPress must be able to load first the parent styles, then the child styles, in that order, so that the CSS “cascades” correctly.
This can be accomplished several ways, but three are commonly used:
- The Child theme enqueues the Parent stylesheet, then the Parent theme enqueues the active (child) theme’s stylesheet. This is compatible with most themes, and is the default method used by Child Theme Configurator.
- The Parent theme enqueues the parent stylesheet if the active theme is a child theme, and then enqueues the active (child) theme’s stylesheet. As suggested by Justin Tadlock, this is the ideal solution, but is not used as often as it should.
- The Parent theme enqueues the active (child) theme’s stylesheet, which uses
@importto load the parent stylesheet before loading the rest of the stylesheet. This method is no longer recommended.
Child Theme Configurator provides several options to handle loading the stylesheets.
Why is @import no longer recommended?
Some articles suggest that Google and other search engines penalize sites that use @import to load stylesheets, and others claim that it impedes performance.
Whether or not this is true, WordPress cannot control the order stylesheets are loaded when a stylesheet imports another stylesheet. Any styles in the imported file immediately take priority over styles loaded before it and this may have unintended consequences.
However, because some themes still hard-code the stylesheet link in the template file, the only way to ensure the active stylesheet will be able to override the parent stylesheet is use @import to import it via the active stylesheet.
For this reason, Child Theme Configurator provides option to use the older @import method, but it should only be used if absolutely necessary.
Why This Is Important:
- Stylesheets inherit from and take priority over styles loaded before them by the browser.
- For a child theme to control the styles of a site, the active stylesheet must load after the other stylesheets.
- Child Theme Configurator provides several options for handling stylesheets depending on the way the theme is written.
Concept 5: Some themes and plugins do not follow Concepts 3 and 4, but there are workarounds.

How Child Theme Configurator adds actions to enqueue stylesheets not provided by the parent theme.
These are the most common mistakes made by themes, in order of severity:
- Placing the
wp_head()anywhere except just before the closing</head>tag. (See wp_head() in the Codex.)
Linking stylesheets or scripts after thewp_headaction will almost always cause them to load in a way that no child theme or plugin can override them using actions. The only way to use a child theme in this scenario is to copy theheader.phpto the child theme using the Files tab and manually editing it so thewp_head()function appears just before the</head>tag. - Hard coding the stylesheet link in the template instead of using
wp_enqueue_scriptsin a theme function.
Because the linked stylesheets load before WordPress outputs the enqueued stylesheets, the child theme cannot link the parent styles ahead of the active stylesheet. This means the child stylesheet must import the parent stylesheets (using@import) in order to override them.Using the @import option in CTC when creating a child theme will allow you to customize the main stylesheet, but you may still be unable to customize the other stylesheets.
Another solution is modify the template to link the parent stylesheet first. Copy the
header.phptemplate to the child theme using the Files tab and edit the line that loads the active stylesheet so that it loads the parent instead. In CTC, select the “Enqueue child stylesheet” option to enable the child theme styles. You can then create overrides for any of the stylesheets that are loaded by the parent theme.<link rel="stylesheet" href="<?php echo get_template_directory_uri() . '/style.css'; ?>" type="text/css" media="screen" />Note: this is only suggested as a workaround for themes that already hard-code the stylesheet. Using the
wp_enqueue_scriptsmethod is always recommended. - Using
get_template()orget_bloginfo('template_url')instead ofget_stylesheet_uri()to link the theme stylesheet.
Even if correctly enqueued, WordPress will never load the child theme stylesheet if used as a parent theme. Use the “Enqueue child stylesheet” option in CTC to enable the child theme styles. - Loading
style.cssbefore other stylesheets
Selecting the “Enqueue parent stylesheet” option in CTC will work, but you will not be able to customize any stylesheets that load afterstyle.css. - Not loading
style.cssat all.
This is easily fixed by selecting the “Enqueue child stylesheet” option in CTC to enable the child theme styles. - Not wrapping functions in
if !(function_exists()))
This means the theme functions cannot be overridden by a child theme. This is not a major concern unless you plan to make significant changes to the PHP, in which case you should probably use a different theme. - Some themes will not work as parent themes without modifications.
- Child Theme Configurator provides workarounds for many common issues with child themes.
- WordPress Template Hierarchy (Codex)
- WordPress Child Themes (Codex)
- WordPress Plugin API (Codex)
- Justin Tadlock, Loading parent styles for child themes
Why This Is Important:
Resources
Child Theme Configurator Pro – Customizing WordPress Themes Just Got Easier
Thousands of users have already seen the benefits of customizing WordPress themes with Child Theme Configurator. Now you can use the top-rated Child Theme Configurator interface to customize WordPress plugins—WooCommerce, Contact Form 7, BBPress, and any other plugin that has a stylesheet. All new design makes it much easier to get the results you want. Read More
Child Theme Configurator Tutorial Videos
We’ve collected all of the Child Theme Configurator Video Tutorials into a single page. Read More
Child Theme Configurator: Create and Customize Child Themes Quickly and Easily
Overview
Child Theme Configurator is a fast and easy to use CSS editor that allows you to create Child Themes and customize them beyond the options of the theme Customizer. It helps you easily identify and override the exact CSS attributes you want to change and gives you unlimited control over your WordPress look and feel while leaving your Parent Theme untouched. * Read the reviews Read More